Pages

Thursday, July 13, 2023

 
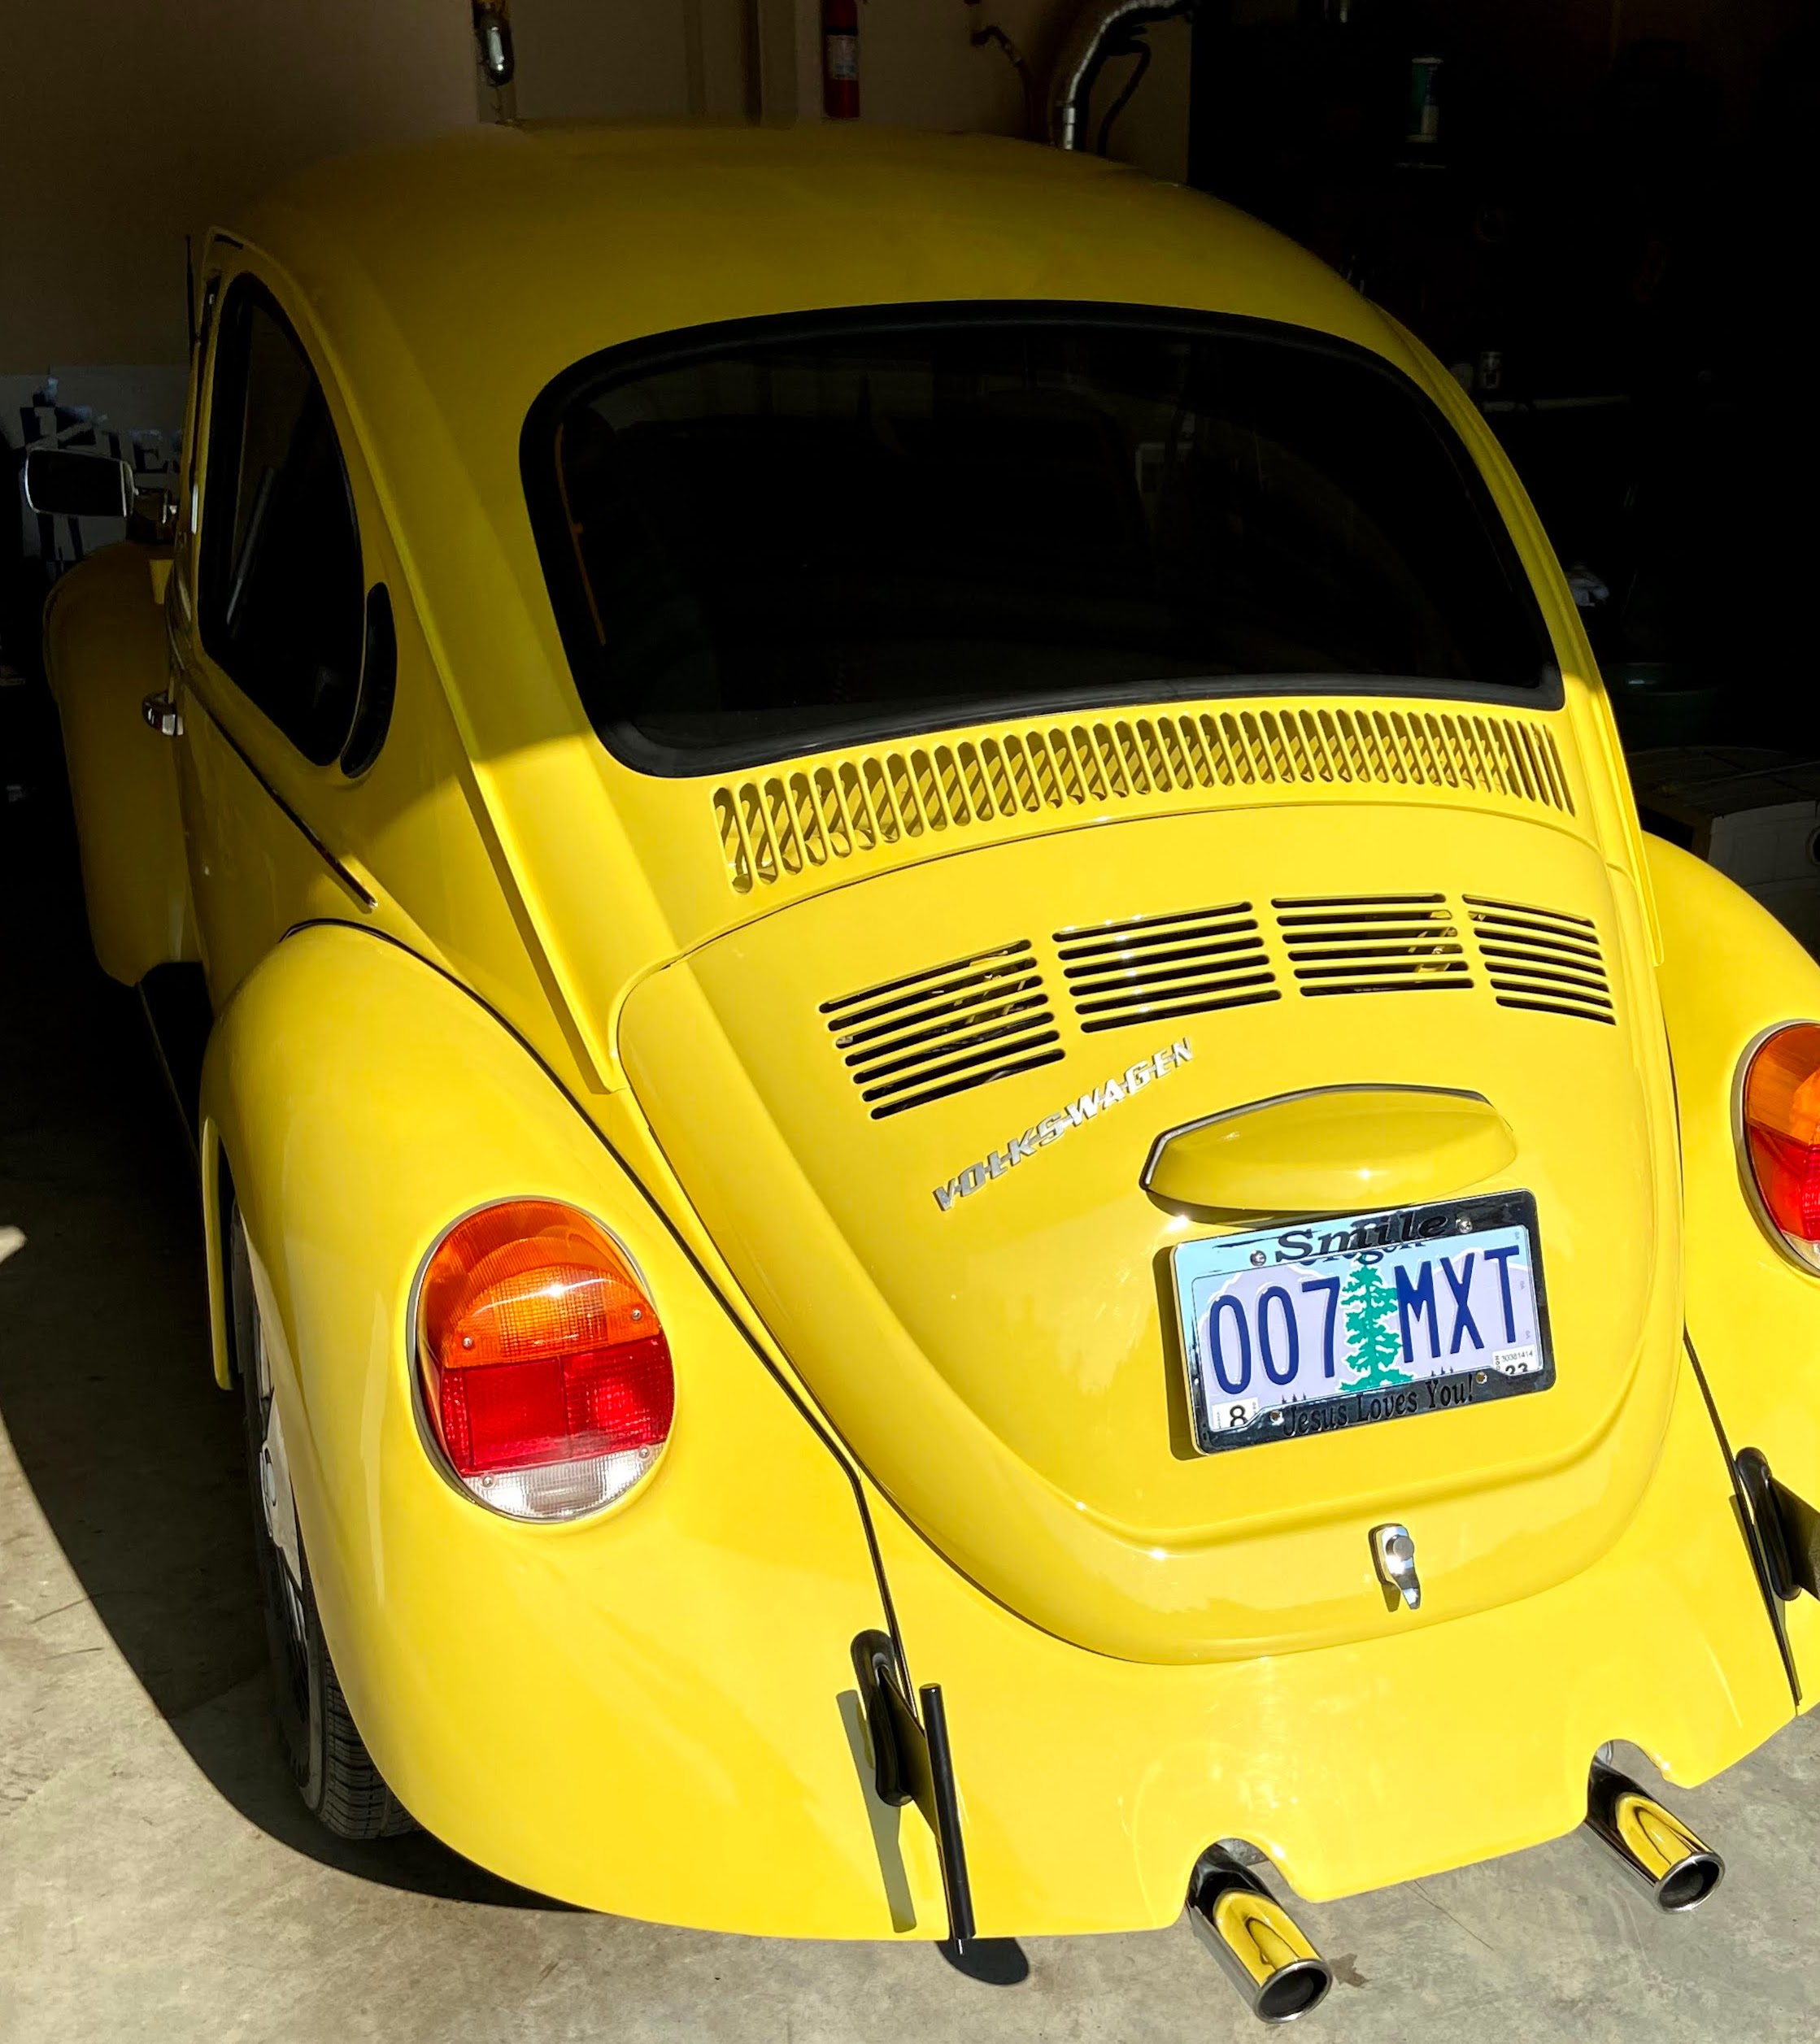
Well, it's time to sell our 1973 VW Super Beetle project car.

It's been a fun 10-year project, but the car is finished now. My son is moving away and no longer needs this one. 

While I'll miss this car, I will surely enjoy have the free space in the garage.

I pray a nice person buys this cute little bug.

Sunday, February 20, 2022

New Interior

Well, we're coming down the home stretch. The custom upholstery is done and this weekend my son and I got the seats installed. It was hard work and wouldn't ya know nothing went right. This car has been a challenge every step of the way, but after seeing the nearly finished product, it looks pretty good.

Now that the major work is done, we still have a few minor things to do, but these should be easy tasks. With my son's help, it should go pretty fast. I'll only need to plan out the money. 

Wednesday, November 10, 2021

Time for Upholstery


Well, now I'm getting even closer to finishing up this project. With the new carpet installed, it's time to get the seats recovered and have custom door panels made with matching material.

These are the seats that are in the car now. They are a blue velour. But I want something different. I thought about Vinal, because it would be easy to clean. However, I think that looks a bit cheap. So, I decided to go with a two-tone material of white and gray. 


Here is a picture of the color scheme that I will try to replicate in my 73. My seats will be a bit different, but the colors will be as close as I can match them.

When I get them done, I'll post a new set of pictures.

Sunday, October 17, 2021

Installed Stock Muffler

Now that I've been able to drive the car around for a bit, I realize that the sport exhaust pipes are a bit too loud for me, so I needed to replace them. I was able to find a nice fella that was willing to swap my exhaust for a new stock muffler.

After a few hours of work struggling to install the muffler, I finally got it done. Praise the Lord!

New Back Seat Kick Panels

While I'm waiting on more parts to finish the interior, I made new kick panels. I saved a lot of money by making my own out of wood and covered them using shelving contact paper. It turned better than I expected.

New Carpet

I finally got the new carpet installed. I was a little nervous about doing this, because I've never worked with carpet. So, I took it slow and got it done. It turned out pretty good.


Friday, September 10, 2021

Carpet Prep - Rusty Floor Panels


OK, it's now time to tackle the interior, starting with prep work. I used a wire wheel to knock off the accessible rust under the passenger side floor pan, then I painted on a rust converter (see below).

After the rust is fixed on all the floor pans, I'll lay down some nice sound barrier rubber to make the car a little less noisy. Then comes the carpet. Yippee!


I'll include a before and after rust shots, then later, I'll add more posts to show the progress. These two photos show a before and after for the rust treatment. The dirty yellow is old carpet glue that will be covered up with the new carpet coming.


Sunday, September 5, 2021

Next Stop - Heater System and Interior Make-over!


Now that the car is drivable, I'm coming down to the finish line by fixing the heat system and then installing new carpet. After that, I'll redo the upholstery.  

My first challenge was getting hot air from the engine, into the heating channels that force air to the heating vents and defroster. There was a complete disconnect under the rear seat. I'll show some before and after pictures.

Over the past few days, I have removed the carpet, fixed the heat connections, and installed sound deadening on the back wall, and on the floor pans. It's all part of getting ready for new carpet.

Wednesday, September 1, 2021

Licensed and ready to drive


OK, now that my brakes work, I want to get it out on the road and drive around. Well, this takes plates and insurance. So, I got that and I'm now puttering around town (close to home). Once I know if the car is trustworthy, I'll travel farther out. 

I love the plate number that a nice lady from DMV gave me. "007" I'm starting to feel like a secret agent now.

Restart!

Wow, how long has it been?  Well, about 4 years. Yep, As I was working on the car, I had a couple of electrical problems and one major problem with the brakes. Years ago, I reworked all the drum brakes, but the car would hardly stop. I replaced nearly everything, but nothing helped, so I kind of gave up for a while, and the car sat in the garage for a few years.

Well, I'm finally back. I found the rubber brake line hoses were clogged, and I replaced them and fixed a leaking rear wheel cylinder. I was so happy thinking that would resolve the stopping problem. While it was better, the car was still difficult to stop, so I finally broke down and bought a set of front wheel disc brakes. 


Friday, May 30, 2014

It's Alive!


Finally, we got the engine put back together and in the car.  It even runs.  Now we have to set the timing and adjust the carburetor to get in top shape.  I purchased a new electronic distributor, but every one that knows about VWs is telling me that the one I got is worthless.  Just my luck.  I hate points, so I'll probably just install the electronic parts inside my original distributor.

Now we can move on to the last few restoration areas, like the interior and installing disk brakes in the front end.  That should wrap this puppy up.  Then the fun begins.  Daniel gets his drivers permit in September!  I'm almost scared to let him drive this thing.  It's like brand new!  Oh well, it's just a car ... right?  Later

Tuesday, May 27, 2014

Engine Rebuild

For the last two months I have been rebuilding the 1600 cc Dual Port VW engine in Daniel's Super Beetle. This has been a labor of love, and I do mean a LABOR!  I've rebuilt about 10 engines in my life from all different makes and models, but this is my first VW engine.  I'm not sure what those Germans were thinking! The engine design is simple, but way different from American motors. The good news is that the basic principles are the same.  Thank God for You-Tube!  I've watched a ton of videos to learn the tricks of the trade in assembly.

I spent a lot of time deciding what colors to paint the engine.  When I was a teenager, I leaned towards yellow and black color schemes.  If was different then, but I thought it looked nice.  Now that this bug is yellow, I toyed with the idea of a yellow and black motor, but I finally landed on a silver and black scheme. I think it looks clean this way.  I also installed a newly released galvanized exhaust system.  I wanted to stay stock, but these pipes were better made and they were less expensive.  Ya just can't beat that deal.

Here are a few pictures of the assemble process.  I hope you enjoy the pics.

Sunday, February 23, 2014

Power Plant Work!

After fixing the starter problem, I discovered a performance issue with my engine.  The heat riser is a tube that vents exhaust gas under the intake manifold to help the gas from the carburetor atomize before reaching the heads.  My heat riser is completely clogged.  This is a common problem older cars.  This clogged heater makes the car run like the engine is dead cold.  After the choke goes off, the car runs really bad.

To fix the problem, you must remove many major engine components to access the heat riser.  I came to realize that it would be easier to remove the engine than to disassemble it inside the car.  Soooooo, guess what I did all day yesterday?  Yep, I pulled the engine.  The good news is that I had help from a good friend and his two sons, along with Daniel.  It was a team effort, so we got a lot done pretty quick.

Once I started taking the engine apart, I saw that I really just need to tear it all the way down and rebuilt it from ground up.  Sitting for seven years allowed massive condensation to get inside the engine and rust was pretty bad.  Oh well, it a hobby, right?  ;)

Thursday, February 6, 2014

Bad Bumpers!

Well, after fighting with the original chrome bumpers and losing, I decided to go with simple T-Bars.  For whatever reason, the back bumper was higher on the ride side.  The brackets must have been bent.  The front bumper, that was given to me when I bought the car, was too small.  It was obviously not for a Super Beetle.

As for the T-Bars, I chose black, since most of the car's color scheme has been yellow and black.  Here are a couple of new pictures.


Sunday, January 26, 2014

Starting Problems Fixed!

For almost a year, we had a serious problem with the electrical wiring in this car.  When we first bought it, the owner told us that the ignition switch was bad and the car would not start.  He gave us a new switch to install, but that did not fix the starting problem.  After months of troubleshooting, I found some burnt ignition wires under the dash.

After repairing those wires, the car started intermittently. Two months later, the problem returned and it would not start at all.  Man was I ticked off!  I could not find any reason for the starting problem.  The circuits were all good.  Low and behold, I found that almost all older VW's has a similar problem that was easy to fix.

The issue was corrosion in the wires that caused enough resistance to prevent adequate current flow to engage the starter.  Compounding this problem was the fact that, by design, all that high voltage had to run from the back of the car, up through the small plastic ignition switch, back to the starter.  This long path added to the resistance problem, especially when the wires were old and corroded.

The good news was that a simple relay could be installed at the back of the car, which shortened the distance of the high voltage from the battery to the starter.  Wowser - a cheap and easy fix! During my Google search about this, I found out that nearly every vintage VW owner knew about this and had installed a starter relay in their car. Unfortunately, I was new at this and I didn't know many VW owners.

In any case, the starter problem is now resolved!  Today we turn the key and the bug fires right up.  Praise the Lord!

Wednesday, March 6, 2013

The Doors Are On!


Well the new year has started with a bang!  After a long winter break, we finally got back to work on the bug.  The doors had proven to be quite a challenge.  It had been so long since we had disassembled them that it was hard to remember how to put the parts back together.  To make the problem worse, the drivers side door was replaced and the new door was not off a 1973.  It actually came from a 1967 bug, which is slightly different.  In fact, some of the internal components were not interchangeable.  We had to find an expert bug guy to help get the doors back together.

In any case, we did it and the VW is finally all in one peace.  Now we just need to put the chrome on the body and install the bumpers.  This summer we will start working on the interior, and next winter I hope to rebuild the engine.

We appear to be on track for having the car complete just in time for Daniel's drivers license.  Praise the Lord!

Enjoy the pictures.

Sunday, November 11, 2012

Door Delays

Well it appears that I have not made any updates to this bog for quite some time.  As you can see from the pictures, we have made some progress since the previous post.  For example, we had the windows tinted and got them installed.  We also put on the running boards, head lights, turn signals, tail lights, wiper blades, and many more items that you cannot see.

However, we have hit a bit of a snag . . . the doors.  The original passenger side door was badly damaged and had to be replaced.  Unfortunately, the door I bought from the junk yard is not a 73 Super Beetle door.  While it will fit, some of the internal components do not interchange.  Now we have a guessing game on how to rebuild that door.  It looks like that may be our winter project.  I guess it doesn't matter, since we're way ahead of schedule.

I'm including a second picture to show the rear end of the car.  It's really starting to take shape.  Next summer we plan to redo the interior.  Then next winter, Daniel and I will remove and rebuild the engine, so he will understand how that works.  Sounds like fun huh?  Blessings!

Saturday, April 7, 2012

New Paint Job

Well the winter is over and spring is in the air.  It's time for fresh starts!  Soooooo, I thought I should get going again on Daniel's VW project.  Last year I tried my hand at body work.  That wasn't the smartest thing I've ever done.  It was a lot of hard work, and I wasn't that good at it.  I had repaired about 15 minor dents and dings and was very proud of my work, until I had a professional painter give me an estimate.  I showed him my work and he slowly ran his hands across the body to see how I had done.  He was very nice and polite and smiled as he slowly said, "That's pretty good for a first try."  When I heard "first try" I knew it was bad.  Any way, he gave me a good price on his work, since he was my best friend's cousin. 

I had it painted the original yellow, since we both liked that color.  The paint job turned out great.  I had told him that I wasn't looking for a show car paint job.  Just a nice "20 foot" job would be fine by me.  That means at 20 feet away it looks good.  Any closer and you could see the imperfections. Well, he gave me a great 2 foot job!  It actually looks good from any distance.

Now the fun begins - putting it all back together.  It's been so long since I took the doors apart, that I might need help remembering how to reassemble them.  I also need to take my time.  This project is going way too fast.  Daniel is still only 12, and he has a few years before he gets his license.  Oh well, if I finish too soon, it looks like I'll just have to drive it some first.  Yippee!

Saturday, July 16, 2011

More Body Work

A few weeks ago, a good friend showed me how to do some body repair on a used door that I bought from a VW junk yard.  He repaired one dent, and made me do all the rest - a good teaching method!  Now that I got the hang of it, I have more confidence about doing the whole car. While it may not be perfect, it should look fine for a teenager's first car.

I've started stripping the body parts off the car, and had the two rear fenders sandblasted.  They need some major body work and starting with bear metal seems like a good idea.  My next post will show some actual dent removals, using a stud welder and body filler.

Later.  ;)

Wednesday, June 15, 2011

Body Work

After weeks of working on the brake system, we decided to move on to something a bit more productive - body work.  Well, not so much real body work, just a little rust removal and priming.  I've tried body work years ago, but I wasn't that good at it.  Sooooo - I was thinking I'd just pay someone to do all the minor repairs, replace the really bad parts, and then have it professionally painted.  However, several friends have suggested that I should try the body work again, before paying.  What the heck!  I have a second door off a wrecked car, so I may try my hand at bondo.  If I can't master the simple stuff, I'll just have it done.  No big loss.  ;)

After working on the new door, I'll probably go back to the brakes one more time.  I now have all the new brake hoses, which should fix the bakes for good.  Time will tell.  Stay tuned.